I am sure there are lots of threads out there in the internet on how to do this... and I don't know that I do anything especially different from anyone else. This is just the method that works best for me.
So with this random 80s movie reference... Let's begin to disassemble...
Extra points to you if you get the reference.
For this segment I am going to be taking apart an LB Super Silhouette Nissan Silvia (S15). Though the process is pretty similar to most Hotwheels
Every Hotwheel that I can remember of have dealt with are held together as a "sandwich of parts.
There is the base (with the wheels) the interior piece, the clear (or colored) plastic that makes up the windscreens, and the body. The body has long "post" molded in that go down through all the layers, and is flared at the bottom to create a "rivet" end that holds everything together.
Here you can see one at the front of the car, and one in the back. The back one still has the yellow paint from the body.
And here is a little closer picture of the one in the front.
The "head" of the rivet is "squished" out to create a flare that is bigger than the hole it came through in the base and holds everything together.
This is the key of how we are going to get everything apart!
For the first step you really only need two of the three tools shown here.
A drill... and a 5/16" drill bit. Again, this size works best for me, but you want something that is large enough to take the top of the river off, but not chew up the base.
I have done more than a few of these, but be prepared to practice a few.
One of the more common problems I have encountered comes with the plastic base cars. As you are drilling the top off the rivet... sometimes the bit will "grab" the base and gouge a big hole in it. This will get the base loose, but does look a bit messy. Luckily this one cooperated, and both rivet heads came off cleanly.
And a little better picture of what I am left with.
From here, usually with just a little encouragement you get a nice pile of pieces.
From here, you can go on to stripping and repainting, swapping wheels, and anything else you want to do to the parts.... but I have a couple of other steps that I do to prepare it for re-assembly when all that hard work is done.
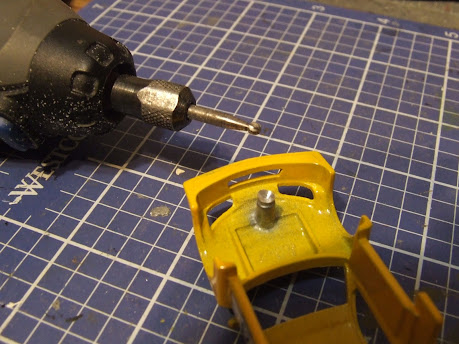
After drilling the posts will look like this, and will work great for re-assembly using superglue to hold the base to the body (with the interior and windscreen pieces in the sandwich) but I like to go a little further.
So I get out my Dremel with a round metal bit, and shave the posts down a little bit and round them out.
This certainly isn't the route you want to go if you are super-gluing everything back together at the end as the posts may be too short now... but I have another plan!
In the second picture, you can see the shortened, and rounded posts.
The next step is probably one of the two trickier steps....
We are going to drill a 1/16" hole in the middle of the post... Not all the way through, but down about 1/4".... Be careful with this step.... the 1/16" bits are very small and break quite easily. I think I bought a cheap pack of them at Harbor Freight... heck I even broke one while trying to take the pictures for this.
The next tool you need is a 2-56 tap set. (I think I got mine off of Amazon).
For those not familiar, a tap is a special cutting tool that cuts threads on the inside of the hole that you just drilled.
Here you can see the tap doing it's thing. There are small shavings coming out that are the threads being created...
Three little tips for this step...
1. Same as the drill bit, the tap is pretty fragile... go slowly... It can be difficult to get it started.
2.I also like to use a small drop of a lightweight oil in the hole...(I use gun oil).. this helps lubricate the cutter, and also helps to keep the tap from clogging up too quick.
3. GO SLOWLY.. I know I said this above... but be gentle.. too much pressure will snap the tap off in the hole... and be sure to back the tap out a LOT and clean it off. This helps the threads to cut cleanly, and helps you get the tap back out of the bod.
Now that we have the posts for the body drilled, and tapped... it's time for these little guys.
Specifically these are #2-56 Button Head Socket Cap, Stainless Steel, Full thread screws. (3/16" length).
All that means is they are little machine screws with the same thread as what we just tapped in the body. they screw in with a teenie-tiny allen head wrench...
And when done....
They look almost like the original thing.
Couple of pointers here.
Using these screws you have to use the dremel to shorten the posts, so that the screws will seat against the chassis and pull everything tight. On some castings, if you don't it won't pull everything together nice and tight.
The same issue can happen if you don't drill the hole deep enough, and the screw bottoms out before everything gets pulled tight. This you can sometimes fix by drilling the hole deeper and adding more threads with the tap.
So that's my method for disassembly....It takes a little longer then the super glue method... but I am definitely fond of the final look when done.
Up next - STRIPPERS!!!


Great tips! Thank you for sharing.
ReplyDelete