Showing posts with label 1/25 scale. Show all posts

Tuesday, November 1, 2022

Polar Lights - 2006 Ford GT Gulf Heritage Edition

 Another one for the collection that I had been attempting to find for a "reasonable" price for a long time.

The 2006 Ford GT!


I loved the look (and performance) of this supercar when Ford announced it was going in to production.

Polar Lights is one of the very few (if only) company that has ever produced the 2006 car in plastic.

The drawback (potentially) here, is that this is a "snap-tite" kit, which typically means that it is intended for a younger builder. Often with over-designed parts to be snapped together without glue. This is great, but does sometimes mean that proportions are off versus the real car to allow for the strength needed to push the parts together, rather than holding them with glue.


I did make a few adjustments to some of the parts, and glued most pieces for added strength when complete...  but I don't think you can tell this is a more "toy like" snap together kit when sitting on the shelf.


I chose to use the "Heritage" Edition of the car that Ford released as a special edition an homage to the LeMans winning cars from the 60's.... though I chose to use number 8, rather than the more tradition number 6 in the big roundels.

And while the car came molded in light blue plastic, I felt the color was off just a little, and mixed up my own batch of "gulf blue", and hand masked the orange stripe the length of the car of on the nose.

I did use the supplied thin black outline stripes to separate the orange from the blue, and was amazed at how close my painted stripes lined up with theirs.  Kit decals were used for the number roundels, Ford decal on the very nose, and a couple small details here and there.

In the picture above, you can see a little bit of the snap tite construction. There is a small "tab" on the clear headlight lens, that you can see the blue of the body. If I had paid a little closer attention, I shoukd have painted the tab black to hide that small issue.


Clear to see through the back engine cover are the supercharger and chassis pieces. As a simplified kit, this was about all the detail that there was... but a little silver paint and they stand out nicely and complete the look.

Another fun one that really stands out with it's Gulf livery paint scheme.


Tuesday, September 20, 2022

Some of my favorite modeling tools

 There are lots of different tools that can be put to use to help with building and detailing small cars.

Aside from the usual ones that most people start with like a good Exacto or hobby knife, masking tape (I prefer Tamiya brand tape) here are a couple that I like.

The first is a set of Carbide Micro Drill bits.  The 10 piece set that I bought ranges from 0.3mm to 1.2mm in size.


These are great for making small holes in plastic (they are tiny and I haven't tried them on diecast metal for fear of breaking them).  I use them for things like wires for spark plugs, opening exhaust pipes, and things like that.


Another one that I like is simply called "Ultra Fine Saw Blades".

They are about the size of a double razor blade, but instead of a single blade they have a micro size saw-tooth edge on both sides.

The picture shows the the blade in a handle for ease of cutting, but I sometimes use it without.

They are thin a flexible but do a great job of cutting. Again I have mostly used these on plastic for jobs like removing parts from the mold trees, cutting open doors and hoods, and they work really well for cleaning out, and deepening panel lines.

I use them for anything that I think is a little too shallow and looks not quite right. A slightly deeper panel line, and light wash of dark paint will go a long way to make things look more realistic.


Next is a handy item I picked up called a "Utility Tools Hobby Masking Tape Cutting Pads Two Sides Digital Camouflage".  I found it on Ebay, and knew it would come in handy.

It's a guide for cutting all sorts of shapes in masking tape.

There are two sides.


There is an etched "depression" on all of the shapes. So you put your masking tape down, and then run your sharp hobby knife along in the depressions and it cuts the shape.

Great for making straight lines for pinstripes!

Or hexagons, squares, stars... even some numbers and shapes.


 This has some shapes cut in the masking tape.

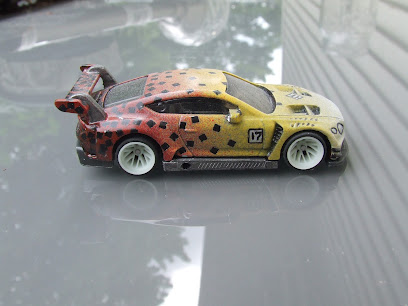
 This came in HUGE when creating the paint job for this one.


 I didn't even try to count the number of tiny squares of masking tape that went down before the fade paint was applied.


Got lots more tool, tricks, and tips I'm planning to share.. so stay tuned!

Monday, August 15, 2022

Revell 69' Shelby GT500 - oldie but goody

 Here's another one that has been completed a while ago.

A Revell branded 1969 Shelby GT500.

It's been a long while, and I believe this was a Motor-City Muscle 2-n-1 kit that I did a while ago.


I always loved the shape of the 69s with the swept rear window, and the hood with all the ducts to feed that massive V-8 under the hood.

This one was finished in a metallic pewter color that has a little bit of brown to it, so it isn't just a straight silver.

The black Shelby stripes down the side contrast nicely.

I also used the larger diameter Cragar style wheels that make it look a little more modern and aggressive, but still have a nod to that classic look.


The interior on these old Shelby's is pretty basic.


Just black bucket seats, doors and carpet. Attempted a wood grain steering wheel and dash to add just a little contrast the all black interior. Also painted some of the smaller chrome details in the center console.

Still think this a great looking body style for the Mustangs, and  this one built up to make a good looking representation without any major issues from the manufacturer or hiccups from my building skills.


Stay tuned... lots more to come.


Saturday, January 21, 2017

1969 Chevy Nova and Ferrari La Ferrari

Two models that I have completed since my last post of the Mustang Gasser Funny car.

The first is Revell's 1969 Chevy Nova SS.


 This is a 2 in 1 kit, so it comes with all of the extra parts to create a stock version or a drag race version.
I chose to go a little closer to the drag race version, but more of a "weekend racer" as opposed to a full on, dedicated drag car a pictured on the box.


I chose to use a nice Chevy green color that I had left over from a Z28 kit that I did a while ago.
Big drag slicks on the back, Custom wheels. Sponsor decals.
Looks more like something you could drive to the track and then make some passes, instead of a "trailer car" that only sees racing duty.

The kit even came with a very convincing decal that looks like melted rubber on the quarter panels behind the tires.
And a nicely detailed engine straight out of the box!
I didn't add any extra wires, hoses or details... just a straight forward, no frills drag car.

And the next one I finished was Revell's La Ferrari Kit....
A fairly complicated kit, of a very complex car. The extra parts (141 total) were necessary to re-create all of the fancy shapes, ducts, and engine parts.

It was going to be a nice metallic blue... but after the basecoat of paint, and before the clear-coat... I kind of liked the satin blue the way it came out... so  I went with it.
It looks now, in the bright sun, like it could have used a second coat of blue... but the sun hasn't been out in weeks, and the my new table location is down the basement, so I probably didn't notice.
Overall a great kit, with lots of detail. A few of the parts locations were a little vague, and required a couple of test fittings... but nothing out of the ordinary.

Some extra detail painting, and contrasting colors, and it really comes to life.
My biggest "oops" moment is the ducts on the engine cover... The instructions say to paint them red... Well, I think was supposed to be if you are painting the car red....
I always like when they call out a color as "body color" rather than a specific color.
I rarely build a kit the color on the box.

I have one other one finished that was a bit of a "slump buster" that was done in-between these two, and yet one more on the workbench, but I'll do more on them soon!

Thursday, January 14, 2016

Revell Corvette ZR1

My latest project was the Revell Corvette ZR1 in 1/25 Scale.

This represents the newer C6 body style.
Featuring a clear panel in the hood so you can see the supercharged engine lurking underneath.
 

The contents of the box are well done, and there was no flash anywhere to be removed, as you would expect from a newer tooling. Parting lines were minimal and required little clean-up.
One that I did miss was this little beauty on the underside of the chassis pan. Yes, I know it was a Revell kit molded in China.
A little work with some sandpaper, and quick re-spray, and it's gone!
Or at least well enough for this one.
I wasn't planning a completely detailed kit. Just wanted it to fill a spot on a shelf next to all it's other brothers from Chevrolet.
A few steps later, and the engine is mostly in, along with the driveline and interior.
Again I left off the seat decals, and a few other small parts, as they will hardly be visible through the small windows.
Still missing here is the radiator and supercharger shroud. But it's starting to look mean!
For the body I chose a darker metallic red that I like. While not entirely a correct "factory" color for the ZR1, I think it shows well here.
A quick test fit of the body on the chassis just to make sure everything lines up, and sits where I want it to.
So several steps later, and lots of little bits and pieces added, it's complete.
Still a little dusty as I took the pictures in a hurry.
It's middle of winter here, and got a quick afternoon with some sunlight coming in, so I grabbed a few quick pictures while I had the chance.
 
Overall, I really enjoyed this kit, and felt that it went together pretty well, with only 1 real problem.
The supercharger sits where it should in the hood opening (I had heard it may sit too low). I am more than pleased with the final results of my "not too serious build."
 
The one problem that I did encounter was the windshield.
I am not sure if I was fitting it wrong, or if it came warped in the box...
But as you can see, it didn't fit the frame quite right. The driver's side, and top of the windshield fit just fine. I tried several different ways, and could never get all 4 corners to fit where I needed at the same time.
So I tried something I knew I shouldn't.... I tried to flex it back.
Regular styrene has some "give" and can be bent.
NOT CLEAR PLASTIC.
I even tried heating it some to make it more pliable....
Nope...
 
So now it fits flush, but it is in two pieces.
I may be looking for a windshield in future, but for now.... It will be good enough.
 
Not sure what is next....
But I do have a Hotwheels Porsche 356 Custom, for the local trade/swap day this weekend yet to unveil...